The Art of Gilding
The weather’s been scorching at Betley Court Gardens, so the thunder and rain that came last weekend has been greatly appreciated. The lawn, freshly mown after No Mow May has benefited the most, the welcome rain turning the grass from straw-coloured to green again.
 |
| The southern elevation of Betley Court, recovering somewhat from the recent dry weather |
Nigel and I made the most of the great weather to finish off the decorative finishes on the front of the house, before taking a week’s break in Oxford. It is also why some blog posts have been missed - there has just been too much on!
It seems we can’t
get away from reminders Betley Court, even when we’re absent. We were walking
to Oxford’s Natural Museum and Pitt Rivers Collection past Balliol College when
we spotted roofing contractors from Attleys Roofing tucking into breakfast baps
at a pavement café. We recognised them instantly as they sported high viz
jackets with the company name on, which made it a somewhat surreal moment for
us. Lovely to see the firm that took
such care over our tiled roof now looking after historic buildings of Oxford
University.
The run-up
to our holiday was quite hectic. We wanted to finish as much as we could on the
repairs to the Craddock coat of arms. Partly, it was the weather; a two-week
block of unbroken fine sunshine was forecast, quite a rarity in a British summer.
Partly, we wanted to leave for our holiday having completed that task – a
psychological win for us, if you like.
The scaffolding facing the road, which will come down soon.
There is
also a deadline we needed to work to. Nigel has booked MD Scaffolding to return
and take down the last of the scaffolding, and although he allowed an extra
week when we returned for any overrun, we wanted to leave as little to do as
possible upon our return. As it was, the weather held, and we were able to get
on with the job in hand.
I mentioned
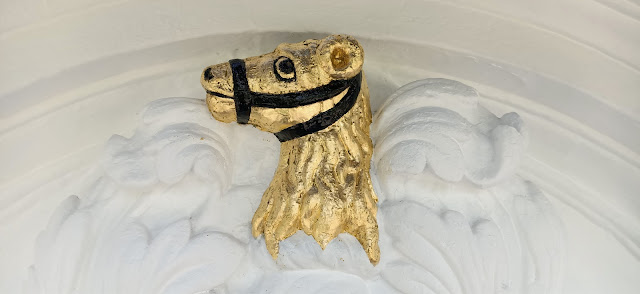
the gilding – the art of applying real gold foil to an object - this is the technique I used to decorate some of the stonework with, and I thought I’d explain what that
entails, as it is a fascinating and absorbing craft skill.
Cleaned stone showing the application of transparent sealer
Any piece
of stonework that is to be gilded must first be sound, so a good surface must
be created. We cleaned down older stone ornamentation to remove lichen and
algae, and loose dust was removed with a bristled brush. Then a stabilising
solution was applied that fixed the surface. We put two coats of transparent
sealer on. This is a clear honey-coloured varnish-like treatment, and it
creates a smooth surface on the stone to gild on.
(centre) mustard-coloured gilding size, drying next to gilded stone work
Next, a
runny mustard-coloured specialist adhesive is brushed on. This is called
gilding size. It is tinted a mustard hue to create a more uniform surface under
the gilding. Gilding size comes in tins marked with different drying times; 1
hour, 4 hours 24 hours. This refers to how long it takes the size to dry to the
perfect point to apply the gold leaf. There is quite a skill at knowing how
long that time is. Not leaving the size to dry for long enough results in a
horrible sticky mess of size and gold. Leave is too long, and the size dries
out too much, and the gold leaf won’t adhere. Perfect adhesion is achieved when
the size is not completely dry, so the gold leaf sticks, but then the size
dries out further, drawing the gold closely into the surface of the object.
 |
| Tools of the job |
Luckily
there is a clever way to ascertain when the right time is to apply the gold
leaf. I was taught to offer up my knuckles or forearm and allow the hairs on my
skin to touch the size to gauge how sticky it still is. Other gilders swear by
a squeak that is made by running a forefinger up the drying size. Experience
tells you when its ready to apply.
Gold leaf on transfer paper
Applying
gold leaf is an art in itself. Gold leaf comes in little books made of
acid-free pap
er. There are two types; loose leaf, a thin foil of pure gold
squares, and transfer gold leaf, which is gold foil backed with thin paper. As
I am working outside, transfer gold leaf is best to use, as loose gold leaf
would most likely blow away in the wind. Much better to use loose leaf in a
controlled studio environment.
Gold leaf
comes in different carats, and just as with jewellery, the higher the carat,
the purer the gold, and the more expensive it is. For gilding outside, gold
leaf of 23.5 carat is preferred as it maintains it sheen the best.
Applying the gold leaf
Once I’ve
established the gilding size is at the optimal point, I apply the gold leaf.
This involves taking a sheet from the transfer book and touching it to the
drying size. On three-dimensional objects, it is quite challenging to transfer
the gold from a two-dimensional plane. After an initial application, I
spot-apply gold leaf in the areas that have been missed. Once as much is
covered as possible (smooth surfaces are easier than pitted surfaces to make
uniform), excess leaf is brushed off and the gold is burnished, then left to dry. The results are
eye-catching. Gold never tarnishes, unlike other metals like brass, and it
reflects light in a way that only gold can.
A finished flower on top of one of the Betley Court urns
 |
| Craddock's bear erase on his coat of arms. The bear appears much happier after his gold leaf treament! |
All best
wishes
Ladybird Su
PS Tickets
for our last house tours of 2023 are now available on our website and
Eventbrite. Tickets £10 plus booking fee.


Comments
Post a Comment